Thursday, December 16, 2010

cinnamon candy - day 6 of the 12 crafty days of christmas

who else loves hot tamale candy?
i do! 
this cinnamon candy tastes just like them and is one of my favorite christmas treats.

for the past several years, i have been making cinnamon candy for teacher christmas gifts.
right after i married my husband, my mother-in-law showed me how to make cinnamon candy. she makes it every christmas. :)
 at first it looked intimidating so i didn't try it for a few years. but after i had 3 children in preschool and multiple teachers, i started thinking that making candy might be an affordable way to give a really special gift to my kids' special teachers. 
so i tried it and i figured out that it's actually pretty easy to do.
you should try it too!

here's what you need:

the recipe is inside the lorann gourmet cinnamon oil package.


here it is:
2 cups granulated sugar
2/3 cup light corn syrup
3/4 cup water
1/2 tsp of red food coloring
(there is also a recipe for a double batch if you need to make a lot! 
it isn't double these measurements so be sure to check the package.)

you will also need:
a candy thermometer
a jelly roll pan
pam
wax paper
powdered sugar
and kitchen scissors

first, combine the granulated sugar, the corn syrup and the water and stir together over medium heat until the sugar dissolves.


then, turn up the heat to high and bring to a boil without stirring. This is where you start watching your thermometer.


when your syrup temperature reaches 260 degrees, add your red food coloring.

do not stir, the rolling boil will incorporate the color into the syrup.


now just watch your thermometer closely because the temperature rises quickly at this point.
when your thermometer reaches 300 degrees (hard crack), remove your pot from the heat.
to test if it's ready, you can drop a little syrup off of a spoon into a glass of cold water. if the syrup forms hard, brittle threads, it's good to go!


wait until the syrup stops boiling, then add your dram of cinnamon oil and stir.


WARNING: 
as you stir the cinnamon oil into the syrup it will steam
(see the picture above)
and that steam can sting your nose and throat.
just be really careful and go slow.
i find that the steam bothers me the most when i pour it out onto my pan so just be aware and take a deep breath before hand, and it should be ok. 
also, the oil can get on your hands so try not to touch your face or lick your fingers. 
because it's cinnamon oil, it's HOT!

after you stir your flavoring in, pour the syrup onto a greased jelly roll pan. (i spray mine with pam.) 


now you will wait until it cools down enough to cut into strips with your kitchen scissors.


you don't want to let it cool too much because then it will break into little shards. 
as you cut the strips, place them onto wax paper that is covered with the powdered sugar.


after these strips cool, you can easily break the strips into little bite-sized pieces.


the powdered sugar keeps the pieces from sticking together and also adds a fun element to the candy.
it almost looks like it's been snowed on!


it's also important to store your candy in an air tight container. if you leave it out, it will get all sticky.

i really hope my kids' teachers enjoy their little treat this year. 
and hopefully, some of you will enjoy this treat too!

(special thanks to my wonderful hubby for being my model while i took pictures!)

again, if you ever have any questions, 
please leave a comment or email me at sewannadesigns (at) gmail (dot) com.

i would love to hear from you!!!


Wednesday, December 15, 2010

homemade snow globes - day 5 of the 12 crafty days of christmas

hi everyone! so sorry i've been missing for a few days.
we've been dealing with some winter weather and school closings here in tennessee and that has totally cut into my crafting time!

in the spirit of snowy weather, how about we make some snow globes today.
this craft is super easy once you have the supplies and your kids will LOVE them!
each of my kids keep them on their night stands and shake them every night before they go to sleep.

here's what you'll need:

a waterproof glue or sealant (i got mine at lowes),
a figurine (i like using the little characters from a village set - this one came from joanns),
a jar (short ones with shallow lids work best),
glycerin,
white glitter (again, i know!!),
and distilled water.

first, you want to use your waterproof glue to glue your figurine to the inside of your lid. 
the most important part of this step is to make sure your figurine will fit in your jar and that your jar will close easily BEFORE you glue it to the lid. 
also, you want to let that dry at least over night and maybe even for 24 hours before putting it in water.

when you are ready to put your snow globe together, fill your jar almost up to the top with distilled water then add a little glycerin and then the however much glitter you would like. 
adding the glycerin makes the water a little more viscous so the glitter takes longer to drop to the bottom once it is shaken up.
next, use your waterproof glue and glue around the inside of your lid to make a waterproof seal. 
screw your lid on, let dry and you have a one of a kind snow globe.

snow storm!!!!!


i found this idea on www.marthastewart.com. you can find the link here.

well, i'm off to drink some hot chocolate and try to warm up! 
happy snow days to you all!

Sunday, December 12, 2010

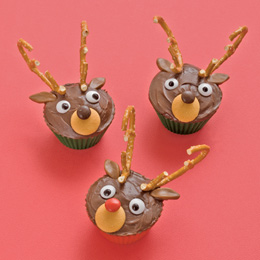
reindeer cupcakes - day 4 of the 12 crafty days of christmas

this fun activity comes from the 2010 december/january issue of family fun.


aren't they so cute!
ever since my kids saw these cupcakes, they have been begging me to do this with them. 
and i thought it would be a great craft to share with you and your family.

here's what you need:
cake mix and icing, pretzels, mini nilla wafers, m&ms,
tootsie roll midgies, small tubes of black and white icing, and cupcake liners

we really love a traditional yellow cake with chocolate icing in my house, but you could make any kind of cupcake as long as it has brown icing to make the reindeer faces.
also, the directions say to use white m&ms for the eyes but i couldn't find any so i just used white icing.

yummy cupcakes coming out of the oven! i could eat them just like this!!!!

while the cupcakes were baking i set up an assembly line of sorts. i cut the tootsie rolls into thirds (reindeer ears), broke the pretzels into antler shapes (this proved to be quite tricky), and set out the right amount of m&ms & nilla wafers.

here are the little elves ready to go!

i showed them an example and let them go for it. they all did a great job and it was really fun to do together as a family.

here are they are with their creations!


i gave them each three cupcakes so we could make each of the 8 reindeer plus one for rudolph, but of course they ALL wanted to have a rudolph so we had 6 regular reindeer and 3 rudolphs. 
whatever makes them happy!


they really enjoyed them!


(of course, the little boy elf scarfed his down before i could get a picture...)

you can find all the instructions here.

lots of cute yummy goodness for the holidays!!!

Friday, December 10, 2010

chalkboard wish list - day 3 of the 12 crafty days of christmas

well, i was going to post this yesterday, but you know how this time of year is...
yesterday was crazy!

so let me tell you a little something about myself.

i love lists!
there is no way i could make it through my life without making about 100 lists a day. 
i kinda even have master lists of my different kinds of lists. i guess it's the accountant in me.
(it's also seems to be the most effective way to organize all the mush that is swirling around in my brain.)

evidently, i've passed this trait down to my slightly flighty oldest daughter.
bless her heart, she is definitely the type who would leave her own head at home 
if it wasn't literally attached to her body.
i can say all of this because she absolutely gets all of this directly from her mother (i.e. ME!)

so this week, as i was making my 2000th list of all the things i need to get done 
and while i was picking up one of the 200 lists my daughter has made of things she really hopes she might see under the tree on christmas morning,
i came up with this idea.

a chalkboard wish list!
especially good for those kids who keep changing their minds!

here's what you need:

piece of plywood (i used 12x24), red chalkboard paint, foam brushes, wooden snowflake shapes, white paint, white glitter and glitter glue. plus some ribbon to hang it with. (i got all of my supplies at joanns.)


first, follow the instructions on the chalkboard paint. i painted two coats onto my plywood. i bought a long piece of plywood so the kids each had room to write some things.


in between coats of the chalkboard paint, i painted my wooden snowflakes white and then glittered them. 
(i think i might be falling in love with using glitter!)


after all of that was dry and had plenty of time to cure, i hot glued my snowflakes to my "list".


i was really liking it at this point. 
my idea was to write "christmas wish list" at the top with a green paint pen, but when i did it, i didn't like it
 AT ALL! 
the green was all wrong! so i mulled it over and just decided to paint over it and try again with black or leave it blank.
 however, when i painted over it, i couldn't cover it up! it just turned the green a greyish color.
after living with it a little bit, it's kind of growing on me. i'm a shabby chic kind of girl and i like that it sort of makes it look worn. 
still not sure yet if i'm going to leave it that way for good.

what do you guys think?


to hang it, i just hot glued some fun ribbon and a bow to the top and used one of those command hooks on my pantry door. very easy removal once christmas is over.

so today's craft was kind of an experiment of sorts. that happens. 
with some crafts, i absolutely love the final product and others, all i can do is think of how i would do it differently next time. 
not sure where this one falls on the spectrum.

the most important thing, however, is that my kids will love writing a list for santa...
 and for their momma and daddy! 

(especially my spaghetti brained, list loving daughter!)

Wednesday, December 8, 2010

christmas monogram - day 2 of the 12 crafty days of christmas

hi there! thanks for coming back to check out my second craft, my christmas monogram!


this is actually a craft that i had the idea for last year. i bought all the supplies and only got half way finished. (so is the story of my life!) 
but now it's finished and i have something really cool to place on my table in my foyer. i actually have a similar monogram that i keep on that table year round, but the colors didn't really mix with all of my christmas decor. (here's the pic of that one)
here's what i did...

you will need a 12 X 12 canvas, some cute christmas fabric, modge podge, a foam brush, acrylic paint (in your desired color), glitter, glitter glue and paint brushes.
(i don't have a picture of the glitter stuff because it was a last minute addition)


i took the canvas and cut a piece of fabric that was big enough to wrap all the way around the canvas.
i then covered the canvas (front and sides) with a thin layer of modge podge with the foam brush. (i don't have a picture of this because this is the part i did last year...)
 i usually just pour some modge podge out onto a paper plate so it's easy to apply to your brush.


then, place the fabric on top, adjust it till it's centered and press it to the canvas on top and around the sides. Let that dry a little then turn it over and modge podge down the rest of the fabric to the back of the canvas.


then you're going to apply several layers of modge podge on top of the fabric. use even brush strokes (so it looks pretty when it dries) and let the layers dry in between applications.

that's as far as i got last year! it had plenty of time to dry, huh? :)

 so, this year i used the "m" i sketched out for my year round monogram
(you could also use a stencil or a die cut too)
and i traced around my template straight onto the fabric covered canvas.

i then took some grey paint and painted my "m" onto the canvas.

now, this is where i intended to be finished, but i just wasn't happy with it. it looked too flat.
i thought about it over night and decided it needed a little "bling"!

i'm not really a "bling" girl any other time of the year, but i love using glittery decorations at christmas.
so i decided to add a layer of martha stewart white gold glitter to the top.
i brushed on martha stewart's glitter glue with a paint brush in sections and then added the glitter.


look at how it shines in the sunlight!


i'm a good ole southern girl so i love having my family monogram on my entry table!
better yet, one that sparkles in the christmas lights!
it's a totally personal christmas decoration that you won't see anywhere else.

if any of you decide to get a little crafty this christmas season, i would love to see your creations. you can email me your pics or send me any questions you might have to sewannadesigns (at) gmail (dot) com.
thanks so much for stopping by!

hopefully i'll have #3 up tomorrow!!!!!

Monday, December 6, 2010

felt poinsettia pin - day 1 of the 12 crafty days of christmas!

so, this is starting a little later than i intended, but we still have plenty of time to fit in our crafty days.  :)
my first craft is one of my own creations.
 if you know me, then you know that i love flower pins for me and flower barrettes for my girls. so, i thought we might need a little seasonal flower to decorate ourselves with this year.

here is what i came up with...
my felt poinsettia pin!

i think it turned out really cute and i can't wait to wear it on my black coat today. 
i think the contrast is going to be beautiful and very christmas-y!

it was pretty simple to put together. here is all you need...

that's a piece of red felt, a piece of green felt, some red embroidery thread, and some gold glass beads. 
you will also need a needle and either a pin or a barrette to attach to it.

i basically just cut six pieces of red felt in the shape of  poinsettia leaves and then one small piece to place in the middle that has the leave shapes all around. 
i did not use a pattern because i didn't want them to all look the same. 

you will see on the center piece that i took some of my red embroidery thread and sewed some gold beads in the middle to resemble the buds in the middle of a poinsettia plant. 
i also thought the felt needed a little more interest and depth so i backstitched (by hand) down the middle of each leaf.
this might sound a little complicated, but it is really easy and did not take much time at all.
i also ended up doing the same on three of the six large leaves.

then, i started gluing everything together. i cut down the 6 large leaves at the bottom to avoid so much bulk. 
i glued the 3 leaves i embroidered together first as the bottom layer.

then i glued the other 3 leaves on top of those.

and the final layer goes on after that! 

that was all that was on my original plan,
but i thought it needed a little bit of green (especially on my black coat!)
so i just cut 2 green leaves to glue to the bottom for a little peak of color.
add your pin or barrette to the back and VOILA!

you have a really cute accessory for yourself, a friend, a teacher's gift, or your little girl!
i always make cinnamon candy for my children's teachers at christmas but i'm thinking these pins might look really cute perched on top of a jar full of red candy.

here is the final product..

and a view from the back...

kinda looks like the real thing, huh?

please come back and visit again. i promise i have many more cute, fun christmas ideas coming!


Wednesday, December 1, 2010

12 crafty days of christmas

our tree this year! isn't it pretty!

so, the christmas season is here you guys, and i'm so excited!

i just love this time of year. there are so many cute things to create and yummy things to bake. 
 it's just all so wonderful!

around this time of year, i am in a super creative mood. i see things in magazines or online and i just want to drop everything and do them immediately.
so i've decided i'm going to do a little series here on my blog called 

the 12 crafty days of christmas!

over the next 25 days I will be posting 12 different crafts that i have done for the christmas season. some of them will be my own original ideas and others will be ideas i've gotten from someone else that were just so good i had to try them. 

i hope you will come back and see what i will be up to this christmas. i also hope that you will be inspired to try some of them yourself!

merry christmas everybody!!!